LED diodes
LEDs are surely one of the most commonly used elements in electronics. LED is an abbreviation for 'Light Emitting Diode'. When choosing a LED, several parameters should be looked at: diameter, which is usually 3 or 5 mm (millimeters), working current which is usually about 10mA (It can be as low as 2mA for LEDs with high efficiency - high light output), and color of course, which can be red or green though there are also orange, blue, yellow....
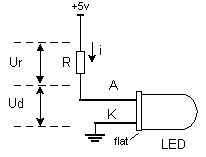
LEDs must be connected around the correct way, in order to emit light and the current-limiting resistor must be the correct value so that the LED is not damaged or burn out (overheated). The positive of the supply is taken to the anode, and the cathode goes to the negative or ground of the project (circuit). In order to identify each lead, the cathode is the shorter lead and the LED "bulb" usually has a cut or "flat" on the cathode side. Diodes will emit light only if current is flowing from anode to cathode. Otherwise, its PN junction is reverse biased and current won't flow. In order to connect a LED correctly, a resistor must be added in series that to limit the amount of current through the diode, so that it does not burn out. The value of the resistor is determined by the amount of current you want to flow through the LED. Maximum current flow trough LED was defined by manufacturer.

To determine the value of the dropper-resistor, we need to know the value of the supply voltage. From this we subtract the characteristic voltage drop of a LED. This value will range from 1.2v to 1.6v depending on the color of the LED. The answer is the value of Ur. Using this value and the current we want to flow through the LED (0.002A to 0.01A) we can work out the value of the resistor from the formula R=Ur/I.
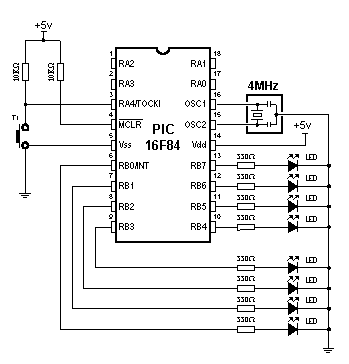
LEDs are connected to a microcontroller in two ways. One is to switch them on with logic zero, and other to switch them on with logic one. The first is called NEGATIVE logic and the other is called POSITIVE logic. The next diagram shows how to connect POSITIVE logic. Since POSITIVE logic provides a voltage of +5V to the diode and dropper resistor, it will emit light each time a pin of port B is provided with a logic 1. The other way is to connect all anodes to +5V and to deliver logical zero to cathodes.

Connecting LED diodes to PORTB microcontroller
The following example initializes port B as output and alternately switches on and off LED diodes every 0.5sec. For pause we used macro pausems, which is defined in the file ROMUX_LIB.inc.
        PROCESSOR   16f84
        #include "P16F84.inc"
        __CONFIG  _CP_0FF  &   _WDT_0FF  &   _PWRTE_0N  &  _XT_0SC

        CBLOCK 0x0C                  ;RAM starting address
            HICNT
                                      ;Auxiliary variables   for  macro  pausems
            LOCNT
            LOOPCNT
            ENDC

            ORG    0X00                ;Reset vector
            GOTO    MAIN
            ORG    0X04                ;Interrupt vector
            GOTO    MAIN            ;no   interrupt routine

        INCLUDE "ROMUX_LIB.INC"
MAIN                                ;Main program
            BANKSEL TRISB           ;Select bank containing TRISB
            CLRF        TRISB       ;Port B   is   output
            BANKSEL  P0RTB          ;Select bank containing P0RTB
LOOP
            MOVLW   0X00               ;Sraitch off  diodes  on port B
            MOVWF    P0RTB
            PAUSEMS   .500          ;500ms  delay   (0.5sec)
            MOVLW   OXFF            ;Switch  on  diodes  on port B
            MOVWF    P0RTB
            PAUSEMS   .500          ;500ms   delay   (0.5sec)
            GOTO      LOOP          ;Jump  to  label  Loop
            END
User Comments
No Posts found !Login to Post a Comment.